

In the autumn the church I attend decided to make a pre-recorded “program” for the children to watch with their parents on a Sunday morning. Recently, I was asked if I would like to contribute and produce some artwork to illustrate the story of Jonah. I like having an opportunity to use my skills, and jumped at the chance.
The story was told in three parts over successive Sundays, finishing last weekend. My contribution was a series of still images and short animations. I’ve had a lot of positive feedback on these, and a couple of people have suggested that I do a write-up of the animation process in a blog post, so today I’ll do just that.
Telling the Story – Requirements
Before starting on illustrations, I had a virtual meeting with the church children’s worker to discuss what would be needed. They had adapted the narrative in the Bible into a script; I would do the artwork for the story, another person would record a voiceover, and a final person would edit the video and audio together and add sound effects. So overall four people were involved and it was a real team effort. (Referring to “another person” seems a bit cold and distant! I haven’t used their names on the blog to respect their privacy.)
To tell the story, quite a lot of animations were needed in total. Illustrating/animating is time-consuming, so there was a need to be efficient: to choose art and animation styles that were simple and quick to do, and where possible to re-use the same assets in multiple scenes.
The Sunday morning children’s program is aimed at younger children, with a typical age of something like 1-7 (though adults who’ve seen it have enjoyed it too!). I haven’t much experience of making things for this age group, so I had a think about what the requirements of this audience are and came up with the following:
- Some of the children are really young, so the artwork needs to be simple to interpret: obvious, somewhat exaggerated facial expressions on characters; keep scenes visually free of clutter.
- The artwork needs to be attractive to this audience: use bright, bold colours and simple shapes; use humour in animations.
- Assume that it’s being watched by someone who can’t read: as far as possible tell the story using changes in colour (e.g. from red for bad, to blue for good), changes in shape (e.g. from spikey for bad/wicked/dangerous, to soft and rounded for good/friendly/wholesome), changes in facial expression and so on.
The Final Result
Here’s my contribution to the final result – i.e. the “animation” part, without the voiceover or sound effects. I’ve added in a text overlay to give a broad-brushstrokes description of what is going on in case the story is unfamiliar.
The animation is in a simple 2-D style, it’s bright and colourful, and hopefully the scenes are easy to understand.
Here’s how it was made.
The Technical Bit
I used three programs: Illustrator, Character Animator and After Effects. This diagram shows the basic workflow:

It looks a little complicated, but it’s really not too bad. I used Illustrator to make all the graphics – character models, props, scenery, and the sky – and Character Animator to animate the human characters (facial expressions, body movements and walking). I used After Effects to do the rest of the animating (waves moving in the sea, the motion of the boat, the worm eating a plant etc), to create special effects (e.g. bubbles coming out of Jonah’s mouth when he’s underwater), and to combine all the different bits together. I then added a bit of camera motion, such as moving the camera in for close-ups of Jonah’s facial expressions. And finally each scene was exported as a video file.
Here’s a bit more detail on two parts of the process: animating the character of Jonah, and putting a scene together.
1. The Character of Jonah
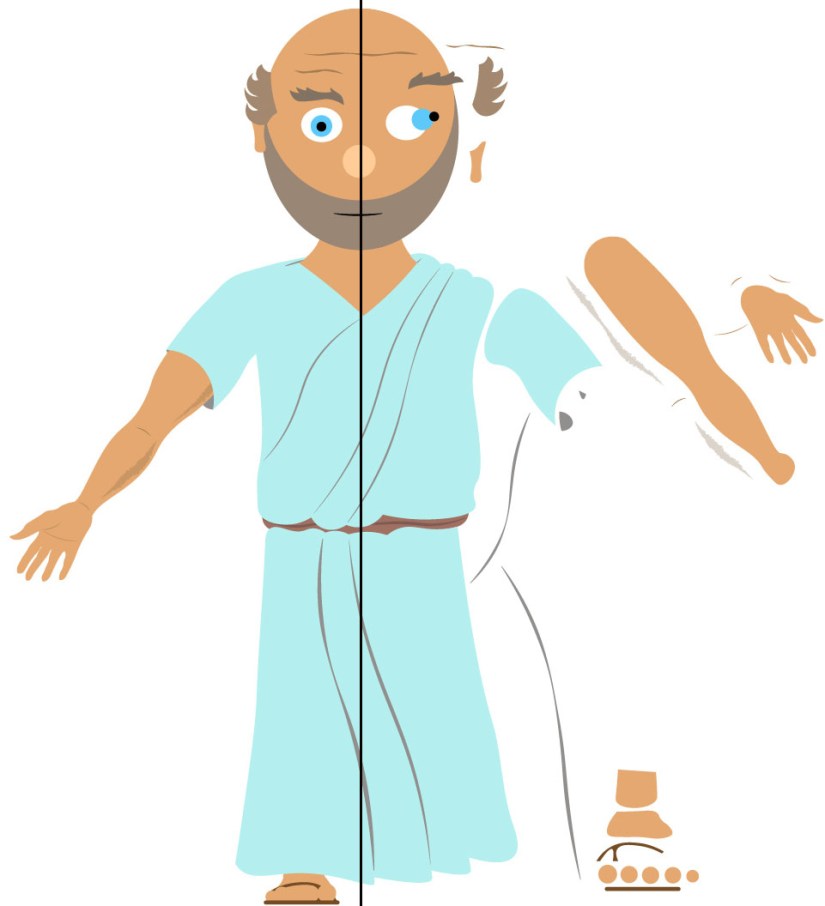
The character file that I made for Jonah in Illustrator shows him in three views: front on, left profile and right profile. The front view was used whenever he was standing still, and the left and right profiles were used when he was walking across the screen.
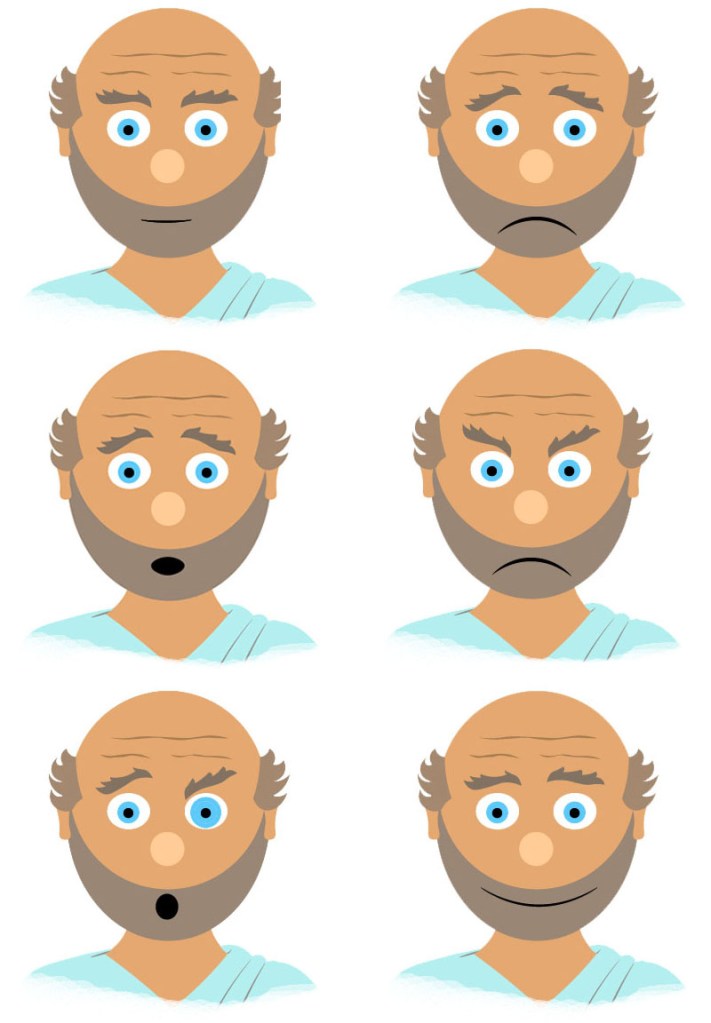
Illustrator works in layers. An image is built up by stacking layers on top of each other, starting with whatever is furthest back and moving forwards. So, as an example, the eye layers have to be on top of the head layer (or all you’d see is a scary eyeless head!) Bottom left below is an exploded view to show how this works. For each view, it was necessary to make a separate expression for every emotion that would be needed in the story. The six expressions needed for Jonah when front on are shown below top right.
When the designing was finished, I imported the Illustrator file into Character Animator. It is designed with characters like Jonah in mind, and the amount of set-up needed to turn artwork into something ready to animate is pretty small. The things that need to be specified are things like –
- where the arms should connect to the body
- how bendy the arms should be (wobbly cartoon arms anyone?)
- which points should be fixed in place when the character is standing still (e.g. the feet)
- setting up particular expressions to play when keys are pressed on the keyboard
Set-up complete, Character Animator automatically calculates a starting walk cycle from the character artwork. As the name suggests, a walk cycle is the series of movements that take place when someone walks – left leg up, left leg down, foot flat on ground, heel up, and so on. It saves a huge amount of time to use a program that creates a walk cycle for you. Once Jonah was moving, there was then a bit of back and forth between Illustrator and Character Animator to make everything look good, but this wasn’t too arduous.
The animating itself used a series of passes, each of which added something to the final result:
- 1st pass – Overall positioning. Use the arrow keys on the keyboard to walk Jonah left and right, and walk on/off screen, or stop pressing keys to let him stand still.
- 2nd pass – Eye gaze and head movement. Using a webcam, my head motion and eye movement were tracked and mapped onto Jonah’s head, upper body and eyes.
- 3rd pass – Facial expressions. Key presses were logged to register changes in Jonah’s facial expression, to express his different moods.
- 4th pass – Moving the hands/arms to give Jonah gestures like scratching his head, mopping his brow and leaning in a relaxed fashion.
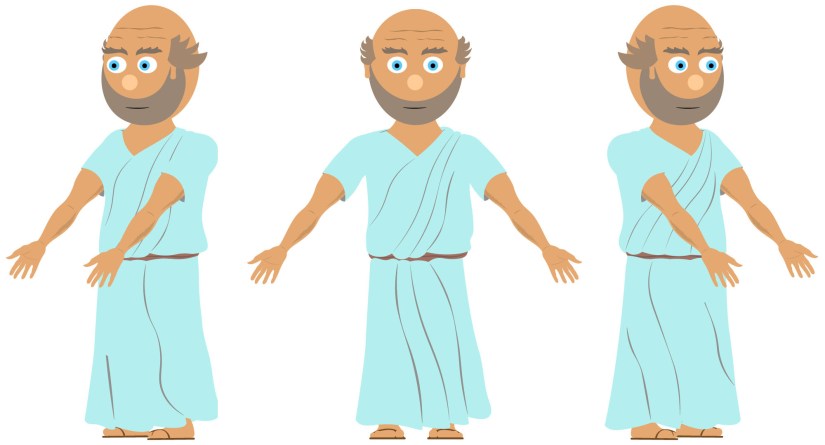
Here’s a short scene showing this. Going from left to right each copy of Jonah has an extra pass included:
(The facial expression for Jonah when he walks to the left is a “default” grumpy expression for Jonah when he’s walking.)
2. Putting a Scene Together
The background, scenery and props were made in Illustrator using a similar method to creating the artwork for Jonah, and then imported into After Effects. Just as artwork in Illustrator is built up in layers, a scene in After Effects is also built up in layers from background to foreground, with each object in the scene (the sky, a tree, a boat, a wave etc.) on a separate layer. Here’s an example of how a scene was constructed:
Some objects, such as the sky, or a beach, didn’t need to move. Others did, like the waves in the sea. I animated each of these separately using “keyframe animation”: I specified where where the object needed to be at key times, and allowed the computer to calculate a path for the object that took it between those key positions. For instance, for a wave, the keyframe information was along these lines: “Start here“; “Two seconds later be further right and up a bit“; “Two seconds after that be further right and down a bit“; “Two seconds after that be further right and up a bit“; and so on.
As well as position, all sorts of other things can be keyframed to produce different effects –
- The height of an object can be changed to give it a squashed or stretched look. Keyframing a rapid series of stretches and squashes gives a cartoon “Boi-oing” effect. This was used on the signs that land near Jonah towards the start.
- The colour and brightness of an object can be keyframed. This was used to change the appearance of the waves when the storm sets in.
- The shape of an object can be distorted. This was used on the fish (whale) to flap its fins and tail, and open and close its mouth.
- The transparency of a layer can be keyframed to give a “see-through” effect, or make something disappear. When Jonah is in the sea and has his head above water, the wave layer in the foreground is completely opaque. As he sinks, this layer becomes partially transparent so that we can “see” him underwater.
- The scale of an entire scene can be keyframed, to give a zooming in/out effect. This was used for close-ups, such as seeing changes in Jonah’s facial expression, or the worm eating the bush.
With a combination of keyframed effects operating on screen simultaneously, the result can be quite an interesting, realistic scene.
That’s a Wrap
That’s a quick run-through of the 2-D animation process I used. I hope you found it interesting. If you have any questions, do leave them in the comments below.

Hi Jonny, Thanks for emailing your animation. I really like it and it reminded me of my time running the Sunday school at St. Andrew’s when we averaged 100 children aged 3-7 yrs. They would have loved your animation of Jonah. Everything you said about the simplicity and bright colours etc would touch young children also adults. I found myself smiling as I watched Jonah’s actions. Reading how you created the animation and put it all together did seem quite complicated to me. Not my skill set.
Your piece on “being asked about your employment” opened my mind to the questions one asks when meeting someone for the first time. I’m sure there are other scenarios where questions can leave a person feeling uncomfortable. Food for thought.
Bless you Sylvia
Sent from my iPad
>
LikeLike